

In our latest webinar, we tell you everything you need to know to get started with Python assignments in CodeGrade. See how you can automatically grade Python assignments in CodeGrade using simple I/O tests or more powerful tools such as the Unit Test or Code Quality test steps. Additionally, we dive deeper into some advanced testing methods such as Semgrep and ways to customize your Unit tests. Finally, find out about friendly-traceback, a great external python tool for making python error tracebacks more friendly for beginners! This webinar was part of our monthly CodeGrade Webinars series and was recorded live on February 4th 2022 - available on-demand now.
Why CodeGrade is the best place to autograde Python assignments
CodeGrade comes with Python2 and 3 by default, no installation necessary! That means you can run your students’ Python code as you would in your terminal. Combining this with the I/O test step makes autograding python assignments a breeze. Not enough? CodeGrade’s Unit Test step comes pre-installed with PyTest and our Code Quality step includes flake8 and pylint. AutoTest’s plug and play interface mean that while you can use most of these pre-installed frameworks without any configuration, you can also install any custom tools, modules, or configurations that you like!
Before we can use all these exciting features we first need to set up our assignment settings by making sure our students know what they need to hand in and what they are being tested on.
Setting up a Python assignment in CodeGrade
Once we’ve created our assignment, whether that’s in an LMS like Canvas or Blackboard, or in a standalone version of CodeGrade, we need to configure our assignment’s general settings. Firstly, we need to make sure that our deadline has been set and our Assignment state is set to “Hidden” while we are creating our assignment (Keep in mind the deadline might have to be set in your LMS). Next, we can check our submission settings and, if necessary, adjust the number of times a student can submit a solution, or allow them to submit their solutions through their own github repositories.
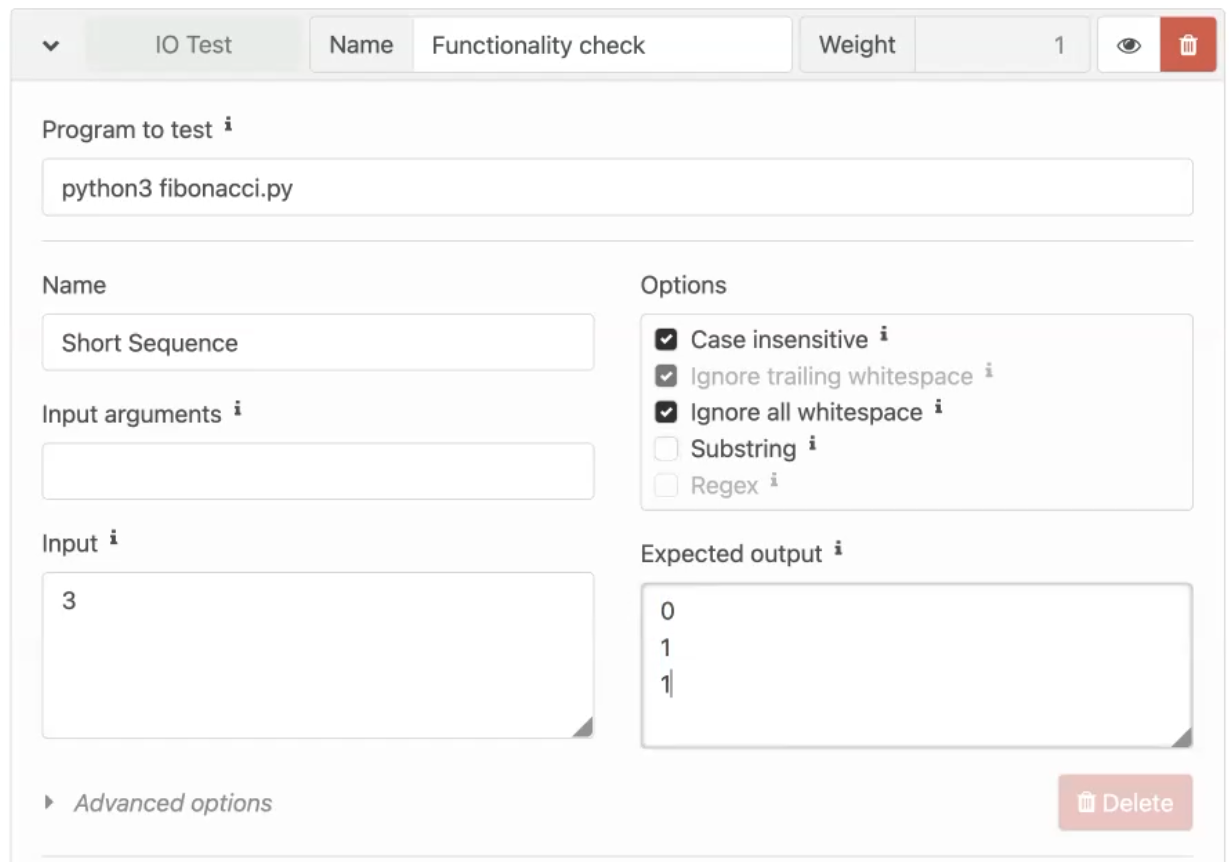
With our submission settings done we can move on to the Hand-In requirements. This setting allows you to specify the files your student is required to hand in and prevent them from submitting anything else. We can do this by, first, denying all files by default and then specifying the required filename. For instance, `fibonacci.py`.
Finally, we need to set up our Rubrics. There are two types of rubric categories, Continuous and Discrete. We typically recommend using discrete rubric categories because you can specify in more detail what your students need to do in order to get each point but in some cases, continuous rubrics can be more flexible, especially when automatically grading assignments. Don’t forget that each description field accepts Markdown so you can make them as clear as possible for students.
How you can use CodeGrade’s I/O test step to autograde you Python assignment
The I/O test step is an integrated feature in CodeGrade’s AutoTest. It allows you to interact with your student’s program as if you were working directly in your terminal and is a great way to test simple Python scripts. We can use the I/O test in different ways depending on whether your student’s code is static, meaning it has a hard coded output, or dynamic, meaning it needs to be interacted with to produce an output.
For static code, we can simply leave the Input field empty and check whether the script returns the expected output. For dynamic programs, we can interact with the code using the input field to test different sets of input and see how our students’ code handles them.
When designing our tests we should consider whether we want to test the entire script or just a specific part of it. In the case of the former, we can simply run the program in the “Program to test” field by entering `python3 your_script.py`. For the latter,, if we just want to test a function or a stored variable we can call these by importing our students’ code using the command `python3 -ic “import your_script”`. The `-i` flag will allow us to use the input field as if we were using the Python interpreter in our own console. We can then access, for example, a function by entering `your_script.your_function(input1, input2)` in the input field.
Autograding Code Quality of Python assignments in CodeGrade
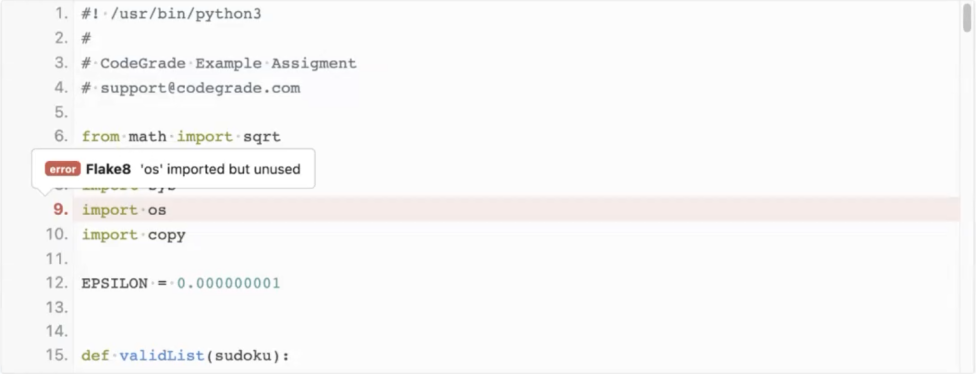
CodeGrade’s AutoTest has a dedicated Code Quality check step. Using this test step we can check the style errors, inefficient or unused code, and other common coding mistakes to name a few. Learning to work with a style guide is an essential skill for CS students and one of the most common style guides for Python is the PEP8 Style Guide. We can enforce the use of the PEP8 style guide with the flake8 static code analysis tool which is installed in the Code Quality test step by default. Unlike other linters, flake8 comes with PEP8 pre-configured meaning there are no extra configuration steps necessary. However, you can of course ignore specific rules by entering the command `--ignore=<your_rule>` in the Extra arguments field.
Alternatively, we could use pylint which also comes pre-installed in the Code Quality test step. It does require some configuration but it provides more flexibility and enables you to create your own custom style guide.
%20(800%20x%20525%20px)%20(15).png)
%20(800%20x%20525%20px)%20(11).png)
%20(800%20x%20525%20px)%20(10).png)